It's easy to get into the holiday spirit when you're creating your own with our Wool Felt Christmas Stockings!
An easy way to add personal flair to your gift-giving this year is with a durable hand-made wool felt Christmas stocking. We love this craft because it's easy to replicate, kid-friendly, and simple, simple, simple! Impress your relatives, and even yourself, with your very own beautifully festive yet totally achievable holiday decor.
Our instructions will make 2 stockings, but you can make up to 9 and have matching stockings for all your family and friends!
This Christmas craft is durable, long lasting, and easy to make. We'll show you how!
What You'll Need
 Note:
Note: For smaller stockings, you can use our
12" x 12" Wool Craft Felt Squares instead. You would need 2 squares of 1 color and 1 additional square of a contrasting color, for a total of 3 squares.
Instructions

1. On the
100% Wool Craft Felt (choose the color you want to be the main color of the stocking), draw out one stocking shape using the
chalk. Using the
scissors, cut out the shape.

2. With the
chalk, trace the cut-out shape 2 more times on the same color of
100% Wool Craft Felt and 3 more times on the other color. Cut out all the shapes with the
scissors. You should end up with a total of 3 shapes in each color.

3. Using one shape from each color (making sure the toe of each shape points to the right), trace out the pattern you want with the
chalk directly onto the stocking. We did a diamond/harlequin pattern. Cut out the pattern from each shape using the
scissors. You can line it up on one of the other shapes to get an overview of what the final pattern will look like. This is also a good time to sew your cut-out pattern onto 2 of the stocking shapes if you prefer to sew it rather than glue it like we did.


4. Take the remaining 4 shapes and pin them together using the
sewing pins based on color (blue with blue and green with green). Make sure the toe of the shape is facing the right.


5. Sew the pinned pieces with the
sewing machine about 1/8” (or 0.5cm) from the edge. We also folded the top of the stocking about 1/4” and sewed the seam, but that is not necessary as wool felt will not fray.

6. Flip the sewn stockings right side out so that the seams are on the inside. Make sure to push the edges from the inside to get a smooth final shape.

7. Take the
damp (not soaking)
towel or cloth and place over one of the sewn stockings. With the
iron on a medium heat setting, iron over the damp towel to take out any wrinkles in the felt. Iron both sides of each sewn stocking for best results. Delicate fabrics (like the 100% Wool Craft Felt) should not be in direct contact with the iron unless the iron is on a wool setting.


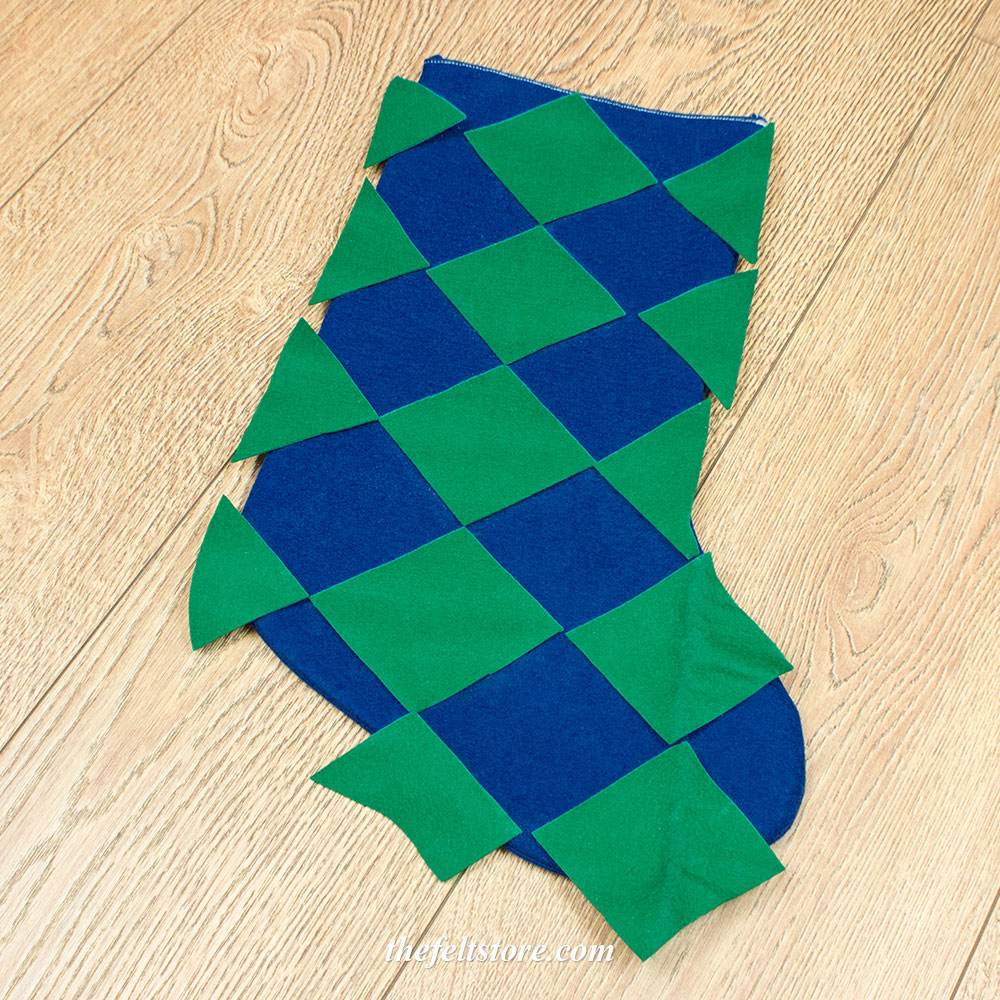
8. Once ironed, lay each sewn stocking so that the toe of the stocking shape is facing to the right. Lay out your cut-out-pattern design over each one to map out the placement for yourself. We started the pattern in the top center and worked out from there to ensure the pattern looked centered on the stocking. Don't worry if your pattern is not larger than your sewn stocking. You will be able to trim the pattern down once it's been affixed.

9. Using the
hot glue gun, glue your pattern onto each stocking. We glued one piece at a time so that we could follow the mapping of the pattern.
Note: You can also sew your pattern on if you prefer, but that would need to be done
before pinning and sewing the stocking pieces together (after Step 3 but before Step 4).

10. Once all the pieces of your pattern have been glued on, use the
scissors to trim around the edges of the stocking so that the edges of the pattern are flush with the stocking.


11. Add any
embellishments or additional decorations that you want. We added
sequins to one of our stockings and a weaving pattern with
ribbon to the other to provide a little extra glitz to each one.


12. Cut 2 small lengths of the
ribbon (approximately 3” to 4” long each). Using the
hot glue gun, glue each ribbon length to the inside of each of the stockings. This ribbon will be used as the hanging loop. It's best to glue one end of the ribbon to the inside of the front of the stocking, and the other end of the ribbon to the inside of the back of the stocking (so the ribbon ends are not glued together). This allows the stocking to open more freely.
Now you can hang your stockings over the fireplace or anywhere else you like!


Comments
Post a Comment